DIY Refurbished Bench
I think just about any piece of furniture, like this DIY Refurbished Bench, can be saved with a little bit of elbow grease. The first big project that got me into this was my kitchen table and chairs. That was definitely a big project. But other projects can be pretty simple like this one! Doing a project like this would be a great way to dip your toes in the DIY world!
This bench we got for free. My husband’s aunt and uncle had a different piece of furniture that his grandpa made and Dustin wanted it. They asked if we wanted the bench and I said if it would fit in the car, sure! So, needless to say, we got the bench to fit.

Of course, I got ahead of myself and took off the hardware before I took this picture. But they were dirty and were supposed to be gold!

Bar Keepers Friend to the Rescue
So I knew I wanted to just reuse the hardware that came with it. I wanted this to be a pretty cheap project. Plus it didn’t need to be extremely fancy it was going out on my repainted porch. I knew immediately what I could use to help clean these up! Thanks to living with hard water for two years, I had to learn some tricks! Bar Keepers Friend! I hadn’t even heard of it until about a year later than what I wish I did! But honestly, I love the stuff! They also have a great glass stove cleaner! But that’s for another post! 🙂

I just sprinkled the cleaner on after I got each piece wet and just took an old toothbrush and scrubbed for all of maybe 5 minutes! I did also clean all the screws too. So easy!

They may not be perfect, but they were perfect for what I wanted them. I was pretty happy with the results!
Now for the painting of the DIY Refurbished Bench
So, now onto the main event! I could have hand-painted this but it would have taken longer and involved another step. Since I knew I was putting this on the enclosed porch, so if it didn’t turn out right it wasn’t going to be the biggest deal. I don’t think anyone has ever said “oh you can’t spray paint furniture” but I’ve always thought spray paint just didn’t hold up as well. For this project, I used Rust-Oleum. It’s really the only kind I ever use. I used the high gloss formula for our bathroom fixtures. We had outdated brown wood towel holders and toilet paper holders. I just didn’t want to spend all the extra money on new ones. And they look like black metal ones!
I thought Spray Painting would be a piece of cake
You might be a pro at spray painting or you might have no experience spray painting. My first project dealing with spray paint was Spring 2020. I was making 5-gallon buckets into cute planters. I thought it was going to be easy. Boy did I have paint runs everywhere! It’s not hard, but it does take practice. You just have to continuously move your hand and not in one spot. But the third bucket I was doing much better! And now I have a handful of spray-painted projects under my belt!
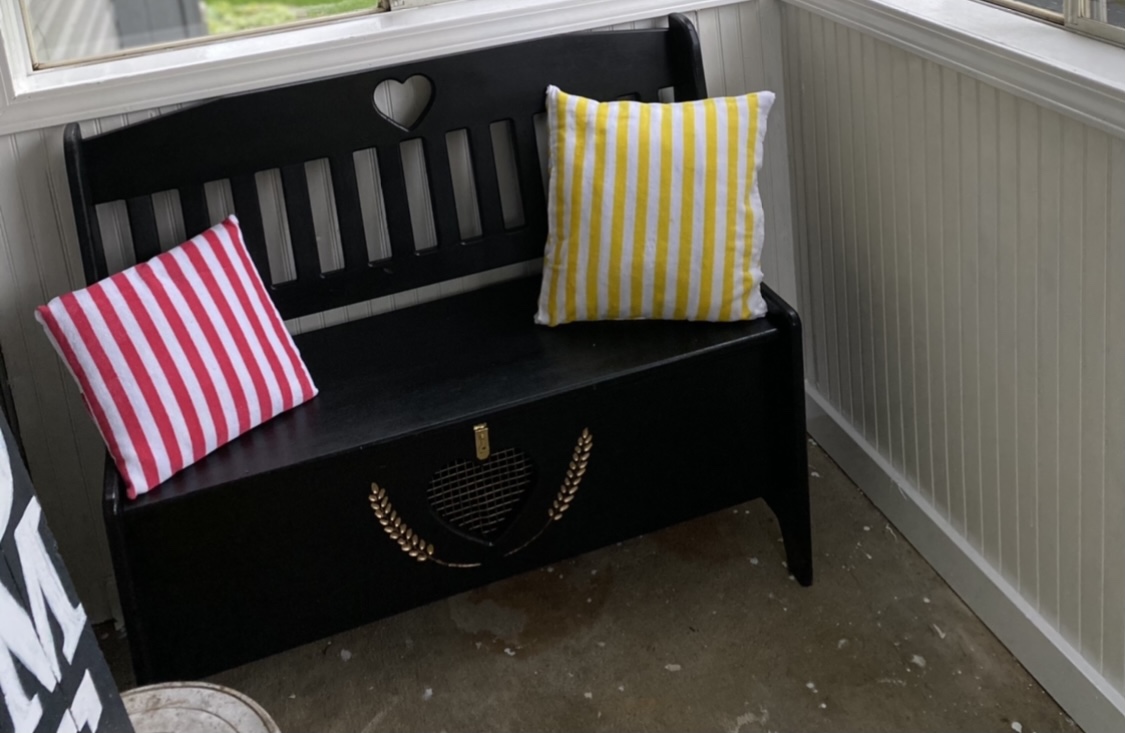
I used Rust-Oleum Painter’s Touch 2X Ultra Cover Ultra Matte Black General Purpose Spray Paint for this project. First, I just lightly sanded it all down and then took a damp cloth to get rid of all the dust to prep the bench. Pretty simple! I left the lid on when I painted it. Next, I had to wait for the top to dry so I could paint inside where you would see through the heart-shaped cutout. The great thing about this spray paint is that it dries pretty quickly! For this bench, I used 1 1/2 cans.

For the screen on the heart and the leaf detail, I used a little bottle of acrylic paint I picked up from Menards for another project. And yes this was before the picture was taken in the middle of me redoing our porch!

Two Projects in One
I waited a full 24 hours before putting the hardware back on. Just so all the paint had time to cure. And I LOVE how it turned out! I wanted something dark to contrast the new porch. I will be posting more on that later! 🙂 But that’s not all I did with this bench!
To my surprise, it also came with two free pillows! To be honest, I was just going to throw them out. Or I was trying to give them to my mom. She didn’t want them either. So I just had them sit on the bench on the porch until I was ready to start the project.


These just don’t match my vibe or decor. I had about 5 months to really decide what I wanted to do with the bench and the pillows. On the bench, I had my mind made up fairly quickly. The pillows, I thought maybe I would have them match the front door I redid. But I couldn’t find material that I liked.
No Sew Project
I went to the Dollar Tree for Christmas, picked up some Christmas towels, and made little pillows out of them. So, that’s what I decided I was going to do with these. I went to Walmart and straight to the kitchen aisles. And I found the perfect ones! They were in the seasonal aisle. But I’m not sure if I will switch them out. I am slowly getting my living room/kitchen into this light green, light yellow, and light pink. And I want my porch to reflect that. These aren’t the exact colors, but that’s okay. I want the porch to be an addition to the living place.

So I found these yellow and pink ones. They are amazingly soft and I believe they were only $1 apiece! I picked up a couple of each to make sure I had enough to cover each pillow. Now, guess what? This was a no-sew project! I know how to sew, but I don’t have a sewing machine. What’s the next best thing? Hot glue! This little hack works like a charm. I just hot glued the towels to each pillow. Super easy and time efficient!

In conclusion, I am so happy how this DIY Refurbished bench turned out! It definitely contrasts the white porch! Did you notice the difference? I was definitely pretty busy finishing this porch up, therefore I’m so glad this was a simple side project! I think I have about $10 total in this DIY Refurbished Bench!
Items I used for this DIY Refurbished Bench:
- Sandpaper
- Small screwdriver (to take off/on hardware)
- Wet washcloth
- Bar Keepers Friend
- Old toothbrush or small sponge
- Rust-Oleum® Painter’s Touch® 2X Ultra Cover® Ultra Matte Black General Purpose Spray Paint
- Acrylic paint with small paint brush
- Pillows
- Kitchen hand towels
- Hot glue gun with hot glue
Have an old piece of furniture looking to redo? This guide would be a great way to. This isn’t just for benches! Check out my first blog post here. This post and any of the items mentioned are not sponsored or affiliated. Follow Roost Eleven Eighteen on Instagram for more ideas and behind the scenes!
One Reply to “Time and Cost-Efficient Easy DIY Refurbished Bench”
Comments are closed.