Follow along for this Budget-Friendly Laundry Room Makeover
I feel like for the majority of August I was dealing with some depression-filled days mixed in with some anxiety. I know I haven’t talked much about my mental health on here yet. But it’s real. I am also wanting to get better with time management, I have a lot going on between my regular job and the Roost.
Budget-Friendly Laundry Room Makeover
Anyways, towards the end of August on a more clear-headed night, I decided to start working on the laundry room. The flooring was the biggest issue for me. It was old peel and stick vinyl tiles. I hated the colors and there was some major yellowing going on. I also wanted to do an accent wall, new shelving, and a new light. And to have black accents since the room is white.
When we bought the house we painted the entire house. So, at least I didn’t have to worry about painting. And I’ll put a before and after of the paint here before we go any further. Everything was painted earthy tones. Not my style. I like crisp, clean, and bright. The worst was the poop green bathroom. But we will get to that at a later post.


I have been trying to remember if we even noticed or talked about the yellow flooring when we first looked at the house. To me, you can’t even notice the yellow to the flooring with how dark the room used to be. I think the bright white walls brought it out. So, maybe I made it worse to live with for the past year. But I’m glad I didn’t have to paint the whole room on top of everything else.
After it was all painted, the main thing was the flooring. Dustin and I went back and forth about what flooring we wanted. We got to decide for the whole year since we moved in. I ended up just going and picking out the flooring myself when he wasn’t home one night. I was ready to start this Budget-Friendly Laundry Room Makeover. So I picked up this Armstrong flooring from Walmart. The main reason why I bought it from Walmart is that I had an $80 gift card that covered a little over half of the cost. But honestly, there were great reviews on Walmart.com and I’ve been impressed with the flooring so far.
Waiting a year lets the indecisive people know what they want
So, the night I bought the flooring, I went ahead and took the doors off. I wanted to paint the hinges and doorknobs black. They were gold and the hinges had white paint on them. ( as I said, I’m not a professional.) I think the next day I started to paint them. With Rustoleum paint, I did about 3 coats over a few days and then let them completely dry and cure for about a week and a half.
Painting VS not painting Doorknobs & Hinges
I talked about this over on Instagram. If these doorknobs were touched a lot, and if we shut these two doors a lot, we would have just bought new doorknobs. I think over time, the paint would chip away if they were frequently used. I’m not worried about the hinges, the paint will hold up. And it sure beats paying $8 for one set and trying to make sure you buy the right ones. I am speaking from experience. I bought two different ones for the front door and neither set was right.
Then came the fun not so fun part. Ripping up the old flooring. We probably could have just put the new flooring right on top. To time though, that just doesn’t feel complete. Plus we had one little spot that wasn’t sticky anymore and Kapper took the liberty to chew it up before we started this room.

Dustin first started just trying to pull them up by hand. That didn’t work. He got us both a couple of scrapers. I mostly just used a smaller crowbar and used the scraper for the parts that were stuck. I just lifted around the front and sides and worked my way back. Just needed to take my time. If I rushed, I would end up just getting a small piece of the tile instead of the whole tile. Maybe took a little longer but I think in the long run I would rather get the floor up in full pieces.
Do what I say not as I do
We did end up taking the trim off. I didn’t want to. But Dustin insisted. Don’t take the trim off if you don’t know how to put it back on. We were in a disagreement on how to put it back on. I told him we could use the same nails but he said we couldn’t. So that ended up being extra work, I had to go back in with the paint to cover up the new nails. But that’s okay, it all turned out in the end.
So, we got all the flooring up. Took about a day in a half. We could have got it all up in one day. But we took some well-deserved breaks. It’s hard being on your hands and knees trying to get the floor up lol and I’m only 23 lol. I can’t find a picture of the floor all ripped up. And here I thought I was doing good about getting enough pictures for the blog
You can do anything you put your mind to
Now came laying the new flooring. I don’t think I’ve mentioned this yet, but this was my first time doing a project like this. I just knew I could do it. Just got to have a little bit of faith in yourself. But I do know when to draw the line. Sometimes, hahaha. Peel and stick tiles are pretty easy. There’s no extra work. Just peel the back off and stick it down. I originally wanted to grout everything but I purchased “not groutable tiles” per the website.
The one thing about this room is that it’s not square. They tried, but the one wall comes out at a diagonal. So we figured we would start in front of the doorway that’s the most square. I worked from one side of the room, worked my way down, and then back up to where I started. One of Dustin’s buddies who lay flooring for a living said we should have started in the other doorway. But that’s alright. You learn to do better for next time.

You can see if the picture above I mess up the piece. There was more of a gap there at the wall so I was able to push the tile further in than the rest. I didn’t realize it until after I put the 2nd one down. But that’s okay, I knew this wasn’t going to be perfect. I got about a row and half done and Dustin took over, I think he thought I was going too slow. He got probably 95% of the regular pieces put down. I only had a few to put down. The worst part was our basement access door.
Budget-Friendly Laundry Room Makeover flooring
At first, I thought we could just place a whole piece of tile over the door and then just cut out the seem. But that didn’t work out that great. Instead, we just cut before we placed them. I think this was just tedious and became so annoying. And we probably took a few days off and then I got the rest done on a rainy Saturday. I think we got the flooring done in about a week. Not horrible, but like I was expecting this to be a day turnaround. I set high expectations for myself, that I don’t always meet.

Back to the Indecisiveness
After the flooring was finished I wanted to build my shelf and put up wallpaper on one wall for an accent wall. I will be posting a separate post for the shelving that we made. So, I found my wallpaper from Amazon. I went back and forth for a while. When I first started planning out this laundry room a few months back I had a completely different one picked out but I lost that one. But I found this one.
I first thought I wanted a different one but my sister and Dustin both agreed this was their favorite and it helped me make my mind up! This wallpaper is peel and stick, exactly what I wanted. The print matches up nice and it is sticking to the wall nicely. I haven’t had any issues! And the rolls I bought and received were correct on my measurements versus what the product description said.

Just like laying flooring, I never put up wallpaper. I first tried doing the whole length of the wall for my first row. That was a big mistake. My best advice is to work with just a couple of feet at a time. As long as you cut straight, your next piece will line up with the previous piece you just laid down. It is super sticky so you don’t want it to stick to itself. I also used a squeegee and worked my way out to the edges to get any air bubbles out. Once I started working with smaller sections it was pretty easy to do. I did end up have a few creases from air bubbles. But I can’t even tell. For the corners, around the window, and at the bottom by the trim, I used a razor blade to cut off my extra.
Budget-Friendly Laundry Room Makeover Almost completed
Flooring and wallpaper is done! I got my painted black hinges on and the doors back up with their new painted doorknobs and strike plates! And then I realized I wanted the outlet covers and the washing machine box faceplate to be black as well. So I spray painted the plastic square and the outlet for the dryer plug. We bought a new light switch and small double outlet and the matching covers. I’m lucky Dustin knew how to easily switch those out. And those helped tie the room together.
Am I cheap or smart? And maybe a little crazy
We got the shelf built and a week later got it all up. Be sure to come back on the separate blog post for the shelf! Then I made some cuter items for my laundry detergent and fabric softener. I love me some Gain, but not the green bottles! I looked around on Amazon for new bottles but I just wasn’t liking the prices. And I thought for sure I could somehow reuse what I already had. And that I did! I use the Gain Flings. So I took that container, spray painted it white and black. Made a cute saying with my Cricut and vinyl. This little side project cost me $0 extra dollars since I had the paint leftover from other projects and the container was already my Gain Flings container.

My other side project was trying to find a container for my fabric softener. I found one on Amazon for $12 but I just really didn’t want to spend money on a bottle. So I thought of something creative. And maybe frugal. A Golden Peak 52 ounce tea bottle! Looks pretty similar to the glass bottles people are using for fabric softeners. It looks cute to me! I love the tea so it was $3 for this little project!

Goodbye ugly light, I won’t miss you
The last big item in this room was a new light! I may have been the most excited about this. We lived with this garage-type light in our house with yellow light for a year and I am so glad it’s gone! We bought this light at Lowes for $60. It’s LED, you get to pick the light setting you want, and then there’s no bulb replacing. Once the light is done you go buy a new one. Which, we were told that LED is supposed to last for a long time.
I made a couple of signs for the laundry room as well. More on those at a later post! I also thrifted some great pieces to style the shelf with! So, a recap for this budget-friendly laundry room makeover:
- New flooring
- Accent wallpaper wall
- Paint touch-ups on trim
- Spray painted doorknobs, outlet cover washer box, and hinges
- Brand New outlet, light switch and covers
- New light fixture
- New shelf
- Thrifted items for shelf
- A few DIY signs
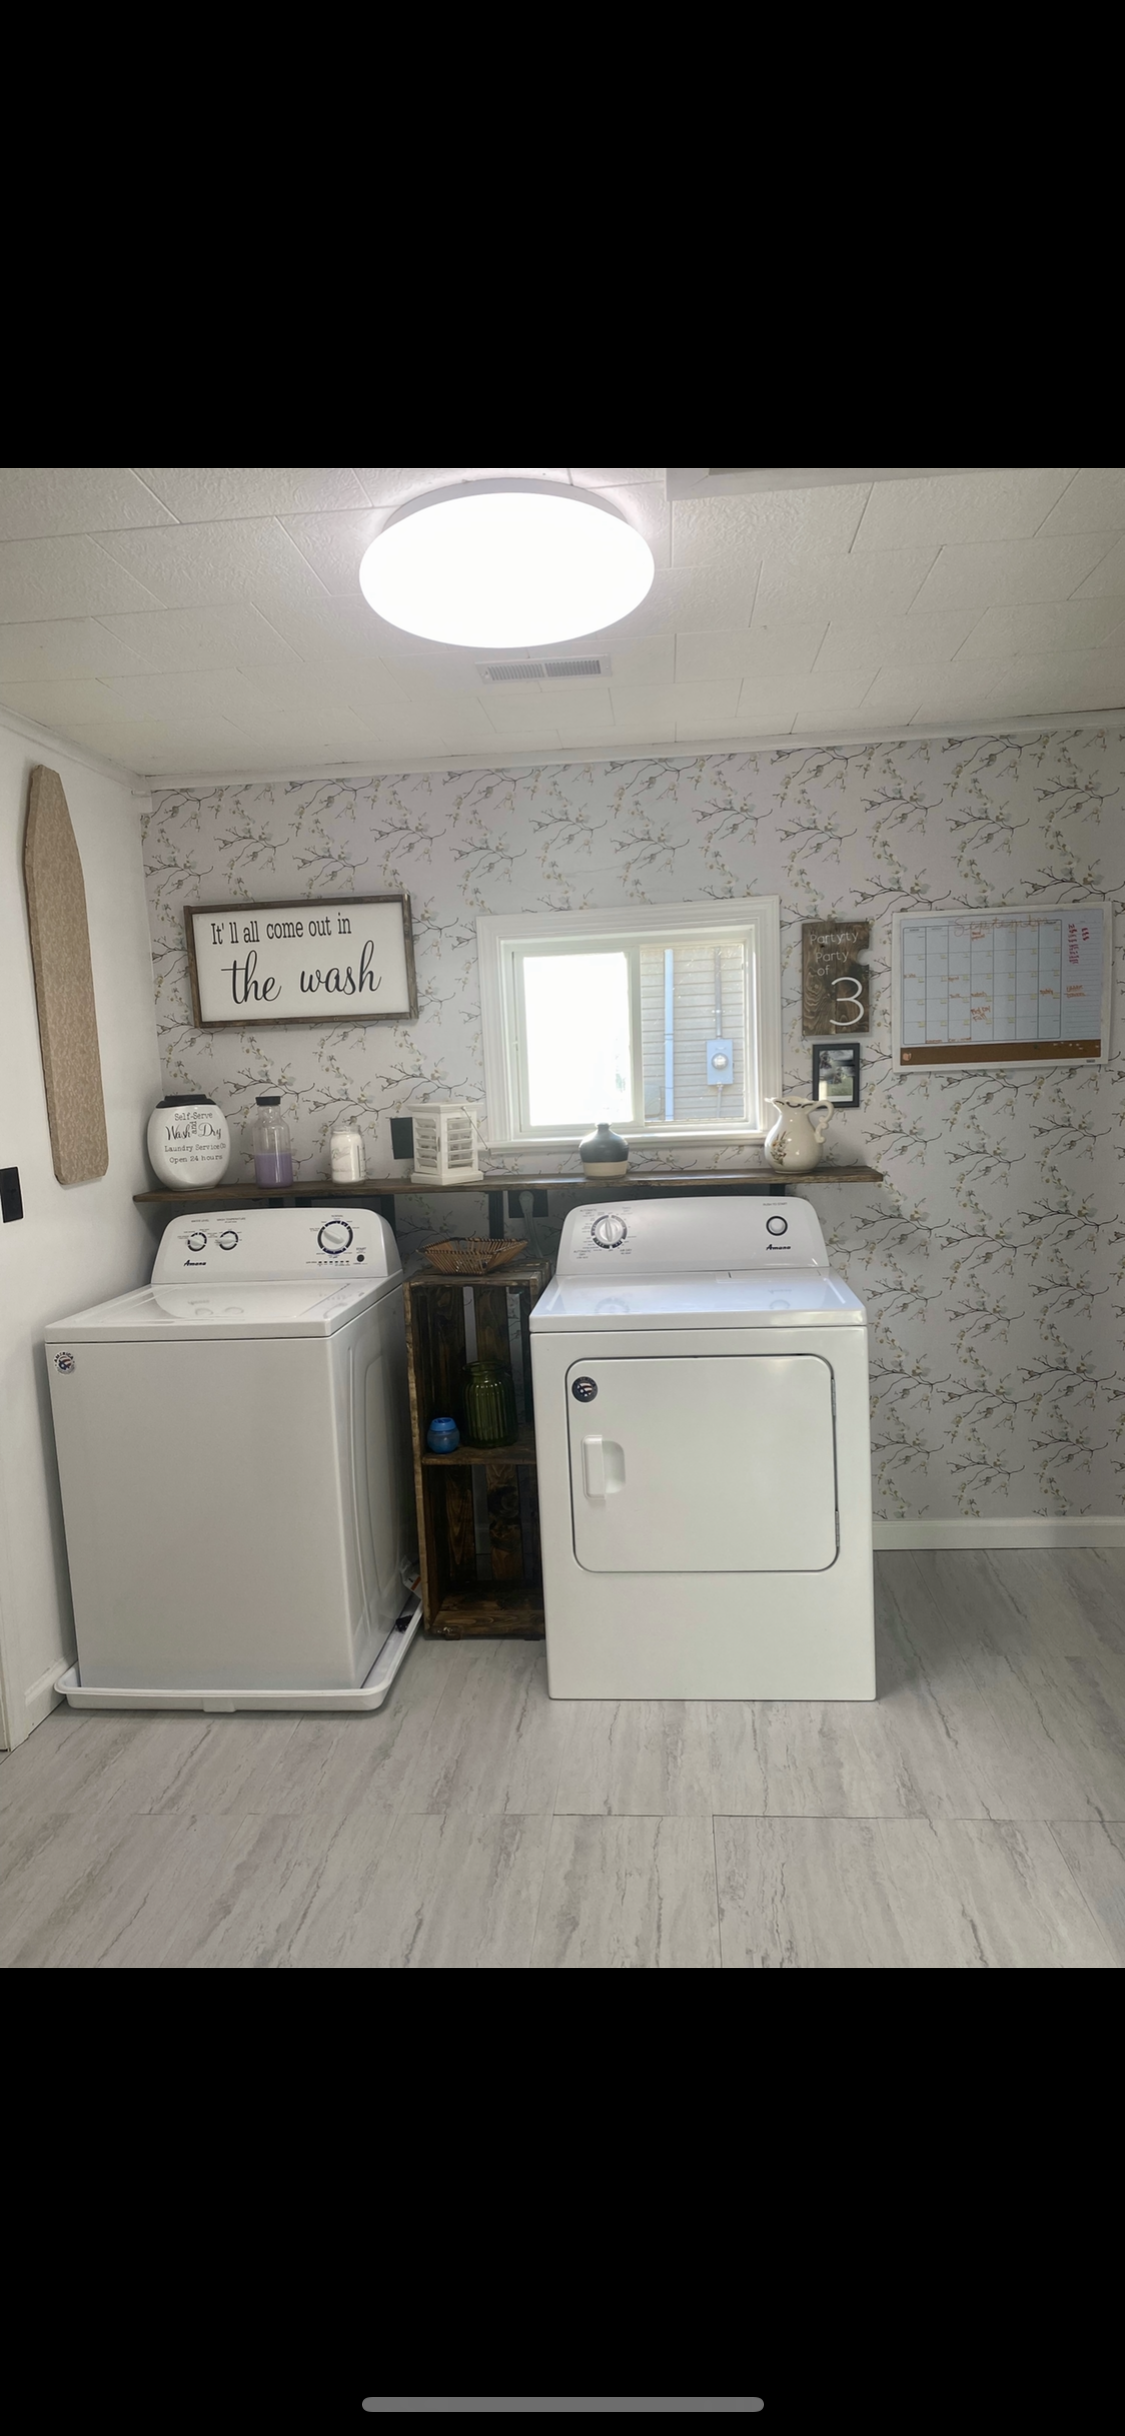
Are you ready for the big reveal? Kudos to you if you read this whole post. I know it’s kind of a longer one! But I am in love with how this all came together!
Budget Friendly Laundry Room Makeover


I think anyone can do anything. I just want to be upfront about my experiences, so my readers know exactly what they are getting themselves into. This makeover hasn’t been the hardest thing I’ve done, but not the easiest either! It was fun and rewarding once we got it all finished! Are you wanting to redo a room? Let me know what you think of mine! I hope this post gives you some comfort, ideas, and encouragement to start a room of your own! I
Check out my newest segment here.
For more behind the scenes and everyday updates follow Roost Eleven Eighteen on Instagram.
This post is not sponsored or affiliated with any of the stores or links I posted.

2 Replies to “Great Budget-Friendly Laundry Room Makeover”
Comments are closed.